Application Design 2 / Task 2
.png)
Bachelor of Design (Honours) in Creative Media
Application Design - DST 61004
Application Design 2 - Task 2
Overview
> Module Information Booklet
> Class Activities
> Task Instruction
- App Flow Mapping
- Storyboard
- Animation Prototyping
- Prototype Overview
- Presentation Video
> Reflection
Module Information Booklet
Class Activities

Task Instruction - Interaction Design Proposal and Planning
Requirements:
1. Interaction Design Documents:
Create detailed flowcharts and wireframes that map out
the user journey and key interaction points within the
application. These documents should clearly illustrate the
layout of each screen and the navigation structure of the
app.
2. Animation Prototyping:
Micro & Macro Animations.
3. Visual and Written Explanation:
Accompany your prototypes with a written explanation or a
visual presentation that describes how these animations and
interactions contribute to the usability and aesthetic of
the application. Discuss the purpose behind each animated
element and how it integrates into the overall user
experience design.
App Flow Mapping
To design the app flow for the Kummute app, I began by mapping out the entire user journey from entry point to ride completion. This involved creating a visual map of the app’s structure, outlining each key screen, and planning how users would navigate between them. This guideline can help me to ensure that the experience is smooth and intuitive.
Click HERE to view on FigJam

Storyboard
For the Kummute app, I created a detailed storyboard that not only maps out the user flow, but also includes the micro animations used throughout the app. These animations play an important role in making the app feel more alive, intuitive, and enjoyable to use. To keep things clear and organized, I organised the animations into three categories: Onload, In-App, and Offload.
Onload
These animations happen when a new
screen appears. They’re simple but effective, like a
screen sliding in or fading in when the user navigates
to it. The goal here is to create a smooth entrance
and help users ease into the next part of their
journey, whether they’re landing on the home page or
opening the ride booking.
This is where most of the micro animations happen. These are the small touches that improve the overall user experience, like when sections transition smoothly during the booking process, or when a loading animation appears while the app searches for available rides. Buttons also have subtle visual feedback when tapped, so the user knows their action has been done. These details may be small, but they make the app feel responsive and polished.
Offload
These animations come into play
when the user leaves a screen or completes an
action. It’s all about closing things out in a
clean, intentional way, like a screen smoothly
sliding away or fading out. These transitions make
sure that leaving a page feels just as seamless as
entering one, keeping the experience consistent and
fluid from start to finish.
The Storyboard:
Click HERE to view on FigJam

Animation Prototyping
At this stage, after completing the preparation and planning, I moved on to creating the animation prototype in Figma.


Prototype Overview
Click HERE to view the prototype in full screen.
Presentation Video
Click HERE to view the video on YouTube.
Reflection
Looking back on this stage of the project, I’ve deepened my understanding of how interaction design shapes the overall user experience. Starting with the app flow mapping for the Kummute app, I carefully planned out how users would move through the app, from launching it to completing a ride. This helped me visualize the structure clearly and make sure each step in the journey felt smooth, intuitive, and connected. The process of creating flowcharts and storyboards allowed me to think not just about screens, but about transitions, timing, and how animations can guide users.
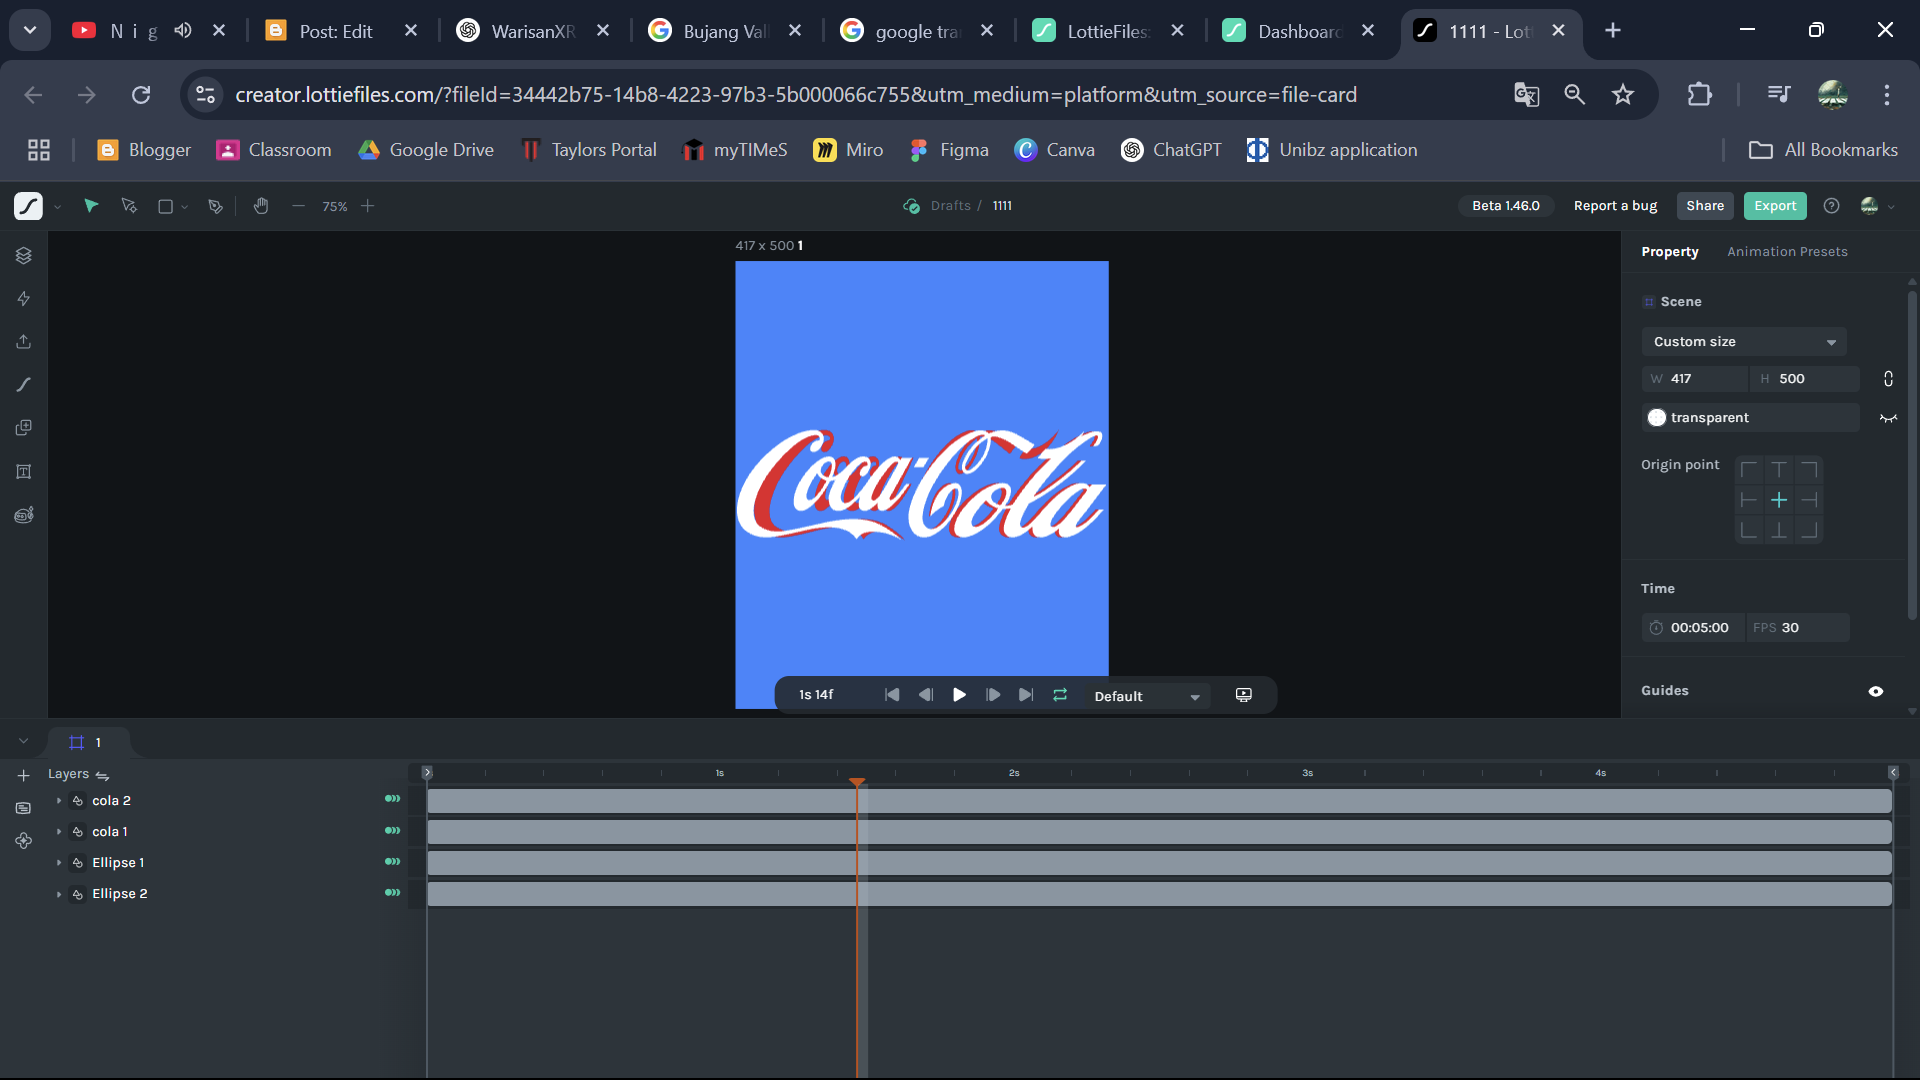
I also had the chance to explore LottieFiles, where I created a simple yet engaging animation for the app logo. It was a fun way to bring branding to life and add movement to the splash screen. At the same time, I began building animation prototypes in Figma, carefully integrating both micro and macro animations to support each user action. These small touches—like animated buttons, progress indicators, or screen transitions, really made the prototype feel more interactive and polished. It gave me a new appreciation for how motion can improve clarity, reduce friction, and make digital experiences more enjoyable.
Even though I haven’t started building directly in FlutterFlow yet, learning about its interface and capabilities helped me understand how my prototype could eventually come to life in a real development environment. I now have a clearer sense of how screens are structured, how navigation actions work, and how animations can be applied in practice. This phase of the project has taught me that interaction design is not just about visual appeal, it’s about creating meaningful and thoughtful experiences that guide users every step of the way.
.png)
Comments
Post a Comment